Ah, Christmas – a time for relaxing, sharing the festive spirit with those you love… and sewing for two entire weeks because you decided it was a good idea to make not one but three and a half costumes on a tight deadline. Hooray!
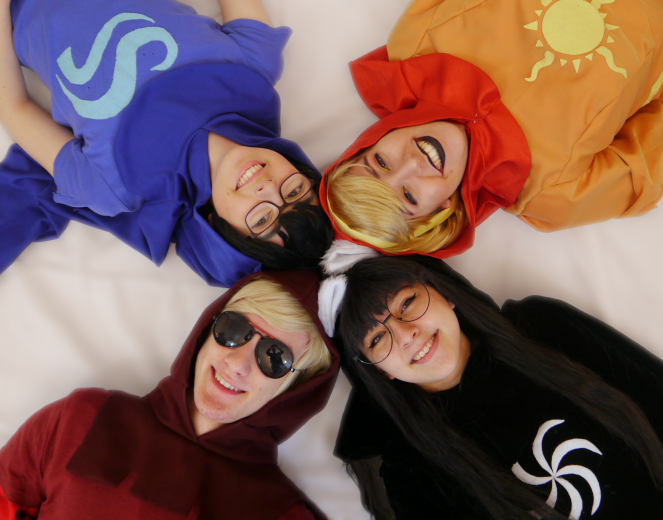
As I mentioned a couple of posts ago, I’ve been on quite the Homestuck kick lately, and managed to convince my best friends to cosplay the god tier beta kids with me for the first time in a good few years. There was one condition though: due to low funds and a lack of time (we’re students), I had to make all of our outfits.
Somehow, I succeeded! I was working until 9:15 am on the day of the shoot (which I left for at 10) and spent a solid 11 hours on the sewing machine the day before, but I got everything done. I only took a single progress picture, but I wanted to share my general methods and thoughts for each costume anyway. (This post turned out way longer than I was expecting, so be warned!)
John (me)


Since I cosplayed John back in April, I already had most of my costume complete and as a result it wasn’t a priority. I still had to fix up my hood though, as there was a six inch hole starting at the base of the neck for some reason, and I took the plunge to make myself a pair of more accurate trousers too. I’d never made a pair before and since they were the last thing I sewed on the machine, they were quite a speedy job!
I used a loose-fitting pair of jogging bottoms for the pattern, and chose a jersey fabric (or something very similar at least) so that I had room for error. I didn’t take many measurements, nor did I suss how to accommodate the fact that butts exist, so I wound up adding two pleats in the front and forcing the waistband to sit higher at the back (by cutting it wider). Starting off with such an easy pair might well have lulled me into a false sense of security but the fact that they look pretty good has left me excited to try a proper pair in the future!
If I was planning to cosplay John with any regularity, I’d consider investing in a new wig and new shoes – the wig I have right now is five years old and of rather poor quality, and my shoes are branded trainers instead of plain pumps. As things are though, I only tend to drag the cosplay out for 413 or nonsense with friends, so it’s fine as is.
Jade (urplemurple42)


I’m pretty happy with the outcome of Jade’s costume, mostly because I find it pleasing to look at! I had to swap her canon colours around because I was using fabrics I already had, and didn’t have enough grey to make both hood and skirt with it. In fact, that grey fabric came from a skirt I’d deconstructed for Godoka a few years prior, and I had black velvet coming out of my ears, so it was a natural choice to switch to a black hood and skirt instead.
Starting at the top – Jade’s hood is a truly weird shape! I’ve seen other cosplayers call it a “two tailed monstrosity” and I wholeheartedly agree. I had no idea how to approach the pattern myself so I used this tutorial from cosplayquestions on tumblr, but I ignored the part about the ear tabs and just cut holes. I can’t offer any original advice aside please, please make a mockup first, because it’s so easy to misunderstand which measurement goes where!
I lined the collar with a generic off-black fabric of some description – slightly shiny, non-stretch, not cotton – and also used it to add an inch to the hood opening, which I then tacked under to form a hem instead of fighting the velvet itself. I’m not sure why but the two fabrics didn’t want to get on at all, and if the result didn’t look pretty good I would have given up altogether. Things got a little better when I flipped the entire thing over to change which fabric was being pulled by the feed dogs, so I’ll remember to experiment with my setup next time I use two different fabrics.
The top was a pretty easy make because Charis and I are very similar sizes, so I just traced a low-stretch top of my own and drew the points. The flared sleeves weren’t too hard either, as it was just a question of adding width and a curve at the wrist – though something went wrong due to my high-speed patterning, so we wound up with some puffy shoulders where there shouldn’t have been any, haha.
The space symbol on said top wasn’t such an easy feat, however! Homestuck’s aspect symbols are on a sliding scale of “pretty easy to appliqué” (starting with Time) to “things that you really shouldn’t be sewing and should probably paint” (with Hope rounding off the list of aspects-I-never-want-to-touch). Space is… much closer to Hope’s end of the scale.
Since my own symbol was felt I thought it’d be coherent if the others were too, but white felt is so extraordinarily flimsy compared to the other colours that I wound up using fusible hemming to attach regular cotton to the underside. This made it a lot stronger and easier to pin. I had originally intended to blanket stitch all the symbols as it keeps them flexible, but the time it would have taken and the finicky design just left me balking, and I opted to use fabric glue instead. Light (Rose’s aspect) was glued as well, because I did not want to stitch on twelve tiny triangles and four wavy lines.
The skirt was far more annoying than it originally seemed. Since the fabric was just a deconstructed skirt – I still had the waistband and zip – it should have been easy to put it back together and take the top in for extra flair. In actual fact I had to create a new waistband for the right fit, and I had to remove at least 12 inches of fabric from the top of the skirt to make it knee length. Unfortunately I forgot to account for the fact that the skirt was originally cut on the bias and as such so was the new waistband, which meant it stretched during sewing and had to be safety pinned to fit during the shoot itself. Damn. But I shouldn’t do that one again, so lesson learnt.
Charis already had most of Jade’s accessories (wig, glasses, tights and shoes) from her original god tier Jade, but I had to make a new pair of ears. I used the generic shape that litters the search results for “fur ear pattern”, and made the inside felt with the outside as short pile white fur. The clips I glued to the bottom worked fine, but they didn’t let the ears rest against the head, so the end result was pretty floppy. In hindsight I’d either relocate the clips or include a wire or foam layer to give extra support.
Dave (lowtuff)


Most of Dave’s outfit was refreshingly easy to put together. Find a pair of browny-red trousers (“burgundy” according to the listing, but they weren’t), a bright red undershirt and a deep red t-shirt, blanket stitch your traced Time symbol to the chest of aforementioned t-shirt, and hey presto! You’re already 90% of the way to being a Knight of Time.
The other 10% – that is, the cape – was significantly more annoying than it had any right to be. (I’ve discounted the wig, shades and shoes since they were already covered from our previous adventures). You’d think it’d be easy to find a heavy brown fabric suitable for making a knee-length cape, right? Think again!
In the end it took three layers of fabric to get the right thickness and colour – wine coloured polycotton twill in the middle for its heaviness and drape, and a layer of some kind of thin brown fabric either side to give it the right appearance. No clue what it was, but it did the job! I wasn’t stringent enough cutting out the pattern pieces so there’s a spot on the neck where the top layer just… stops well before the actual seam, and the wine layer shows through – it’s not too easy to see from the front though, and I was in a bit of a rush. How many times do I have to write the words “TIME MANAGEMENT” across my own forehead before it sticks?! 😛
The pattern itself wasn’t too hard, but I made a couple of mistakes during drafting that really didn’t help. I misjudged the hood size – I don’t know how, because I tried everything out and it should have worked – badly enough that I had to add a 3 inch strip between the hood and the rest of the cape. It also took a lot of tweaking with measurements to get all the neck pieces to line up. I finally got the neck business down with this hood though – it was the last of the four hoods that I made, so it’s about time haha!
Rose (kibitalia)


I’m so pleased with how Rose came out! Even if she wasn’t perfect, she was the most challenging of the four, so I’m okay with that. I did also have an ironing mishap or two during this costume – don’t underestimate how fast an iron can heat up. If you turn it too high for a second by accident, then put it back down so it won’t melt your synthetic fabric and carry on a few minutes later… it will melt your synthetic fabric.
Following my own advice I made a mockup for Rose’s hood, because of its super weird tail. The calico draft worked perfectly, fitted together and had plenty of room for the neck hole and between the face and shoulders. The final product shouldn’t have gone wrong and I don’t understand why it did! It’s all well and good saying you learn from your mistakes when you get why you made them! I’m not likely to make another Seer hood either, so there’s no chance of working backwards from a successful make to see what happened.
The hood I actually made was far too small for anyone’s head to get through – I struggled to understand any measurements once the thing was 3D, but anywhere between one and four inches just… disappeared. Where did they go? Seam allowance eating them? Botched fabric cutting? Misunderstanding where the neck hole actually started? We shall never know. In the end I just cut it open at the front, hemmed both edges (like all my collars, it’s double layered, so the shape held) and safety pinned it shut on the day. I can’t be too mad though – the resulting snug fit does actually look pretty smart! Silver linings…
Rose’s dress was stressing me out for quite a while before I actually attempted it. I originally planned to just take Kym’s measurements and draft a pattern with them by myself. This did not work. I don’t know enough about pattern drafting to do something like that yet! I think I should work with some proper patterns first… My second plan was to grab a base dress with darts that I could cut apart and modify, but with the deadline close and the charity shops turning up empty, we had to try something else.
In the end, the method that worked was draping the dress on Kym herself – or, cutting on the stand when the stand is a person that you can’t stick pins in! I felt a lot more confident working this way, especially since I did an introduction to cutting on the stand very recently in class. It was also a fun, if strange, experience, and a good chance to catch up with her!
I didn’t take any photos of the process or result due to the speed at which we did things; I wish I had done, since the pattern looked fairly wacky due to significant bust and waist darts and the unusual tunic look! It got a lot messier not long after, too – the darts were off centre so I had to reposition them, and typing this up now I do wonder if that’s why the dress wandered off centre so often during the shoot. Bodies aren’t usually symmetrical, after all. I haven’t done enough of this stuff to work out what’s just a body being a body, versus what’s an actual mistake.
Like Dave’s hood, choosing fabric for this dress was a nightmare, since we were working within a budget and had a small range available. Finally, I decided that I like my friends more than I like having a will to live, so I chose a bright orange polycotton and a yellow organza, with the end goal of layering them. I doubled the workload of the dress in the process, but the end result was a great colour and had the fun side effect of becoming two-tone!
I am very distrustful of organza, so I chose to mount all the pieces first, to prevent slippage or random pleating while making the final thing. It shouldn’t be hard to sew six bits of netting to six bits of fake cotton, surely.
It is.
Or rather (to be more precise and less melodramatic) the task becomes a lot harder when two of the pieces are almost five feet long, and one of those is cut so crooked it’s unsalvageable and you have to slice it in half, reattach it, and then add an extra piece to the bottom to cover the inches you lost fixing the diagonal. Yay me! Sloppy cutting strikes again! Except this time I am absolutely certain it’s just organza being its slippery-ass self, so next time I will use even more pins. One day, I will pin it into submission.
Once the nightmare preparation was over the rest of the make wasn’t too bad though! Except for the part where the armholes were too big so the dress sat too low, that wasn’t so good. It’s an easy fix though, you just have to sew the shoulder seam again further in, and pray that the pleating god has mercy on you with the new fold in your sleeve.
Like I did for Jade, I used fabric glue to attach the aspect symbol to the dress. I mean – twelve triangles, four wavy lines, a circle, and two scroll shapes at the hip, all sewn by hand starting at 11pm the night before the shoot? You can miss me with that one, thanks!
There was concrete evidence that my desire to sew them was rational, as a couple of the pieces started to pry loose over the day, but the other rational side of me says that it won’t be hard to just glue them back down. I don’t always need to make extra work for myself, especially if something’s only going to be worn a few times in a casual setting.
The last things to sort were the leggings and shoes. Charis saved the day on the leg front by dyeing a white pair for us (have you ever tried finding neon orange clothing in the depths of winter?), leaving us free to roam the shops for a pair of sky blue flats. Sadly, like the orange leggings, blue is a summer colour and flats are a summer item: the shoes we needed were nowhere to be found. We settled for a shiny turquoise pair from Primark – slightly too small, but Kym managed to stretch them somehow. Mission accomplished.
(You can also see yellow ribbons and a yellow hairband on Rose in the pictures – those were both sorted by Kym! The waist ribbons look like they’re floating in a lot of photos thanks to my editing: the leggings don’t actually go all the way to the top of the dress slit, so I kind of stamped away the skin gap in PS Elements, at Kym’s request. The ribbons hide some of the gap as they were tucked almost above the waistband – adorable and functional! The hairband is from canon, though ours was a quick fix using two hairgrips and more of that yellow ribbon. It worked surprisingly well and I think it’s cute!)

Dang, I think that’s everything! And it’s a lot, actually, especially with doing Christmas Honoka in December too. After counting up my costumes for the year, I did almost as much in those two weeks of break as I did in the rest of the year!
Honestly, I’m thrilled to pieces with how this project came out. I really feel like we’ve done these characters justice, but I feel kind of bad saying that since I was responsible for most of the costumes… Seriously though, my friends fit these characters so well, and I’m chuffed that they’d trust me enough to make their costumes on their behalf. I love the beta kids and I love my pals, so I had a whale of a time on the shoot day itself too. I’m tempted to ask if we all want to do it again at 413, but it seems like we took enough photos to last a lifetime!
I learnt a fair amount during this project – including how to draft and sew really weirdly shaped hoods, at long last – and I doubt I’ll be doing something this labour intensive for a while. At least, I hope not! You never know, with how uni can be and all.
Thank you so much for reading this big ole post! I have no clue at all about next week’s one – week two and going strong, am I right – because I head back to halls… a few hours ago? I wrote this post on Friday and scheduled it haha. Anyway, we’ll see how things roll, and I’ll see you next week!